No Knead Sourdough Bread
After a lot of experimenting and tweaking, I am so happy to be sharing my easy recipe for no knead sourdough bread with you! Because it’s an overnight sourdough bread, there is minimal hands-on time required, and the flavor is absolutely delicious!

This post contains affiliate links, which means I make a small commission at no extra cost to you. You can read my full disclosure.
If you enjoy baking sourdough, but hate having to keep tabs on it all day long, this overnight sourdough recipe is perfect for you.
If you are familiar with my no discard and no feeding sourdough starter recipe, then you probably know that I like things to be simple. No fuss.
While there are already plenty of good sourdough recipes out there, most of them are pretty involved. There is a lot of folding and stretching and keeping an eye on the clock. So why bother with yet another one?
What makes this recipe special
Ingredient Notes
This recipe makes a true sourdough bread because it uses an active sourdough starter (you can easily make your own). And there is a 10 hour fermentation time, so you get all the health benefits from sourdough fermentation.
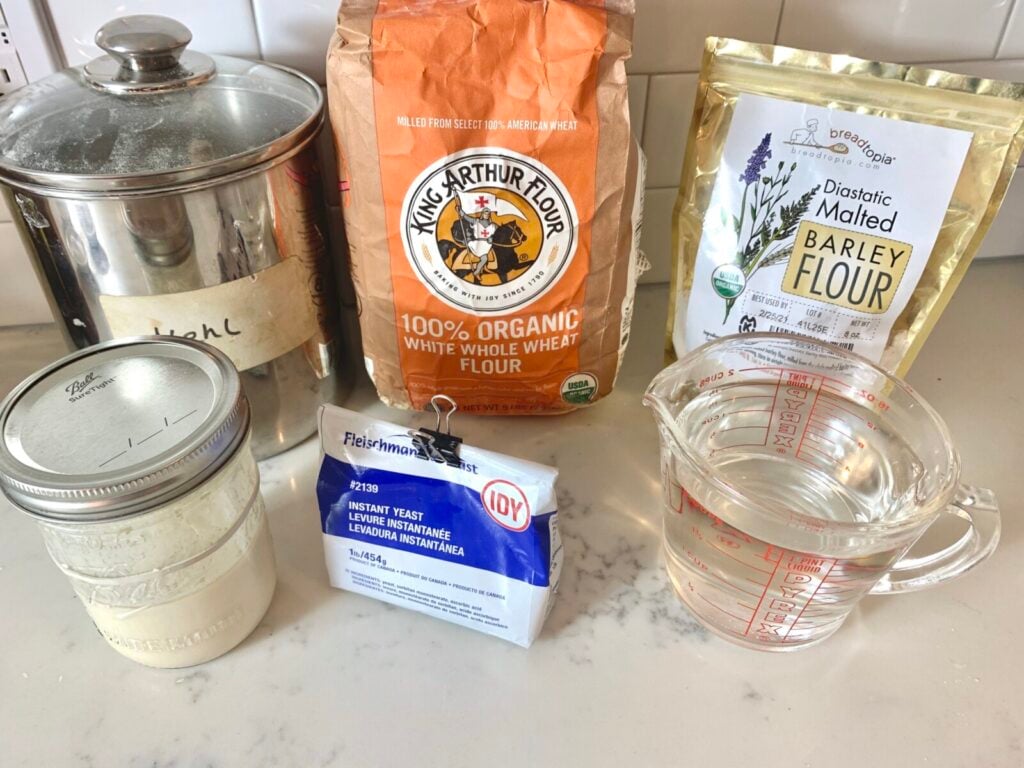
However, there are two special ingredients that make this sourdough recipe much easier to make. They are instant yeast and diastatic barley flour.
- instant yeast: Adding yeast to the dough helps it rise better. While I love traditional sourdough, the dough can be a bit temperamental. It is highly affected by ambient temperature, humidity, and wild yeast in the air. Using yeast ensures that the dough will rise without a problem.
- diastatic barley malt, also known as malted barley flour. Professional bakers use this ingredient all the time. I like to say it is a bit like steroids for the yeast. Because of its sugars, barley malt boosts the yeast, giving the bread a better flavor, texture, and crust.
Thankfully, malt flour is pretty easy to find in most grocery stores, but you can also buy it online, here.
Did you know? Wild yeast and lactic acid bacteria are both part of the microbial makeup of sourdough.
Here are the remaining ingredients for one big loaf of overnight sourdough bread. If you prefer, you can make two smaller loaves instead.
- warm water: the warm water gets the dough into action faster
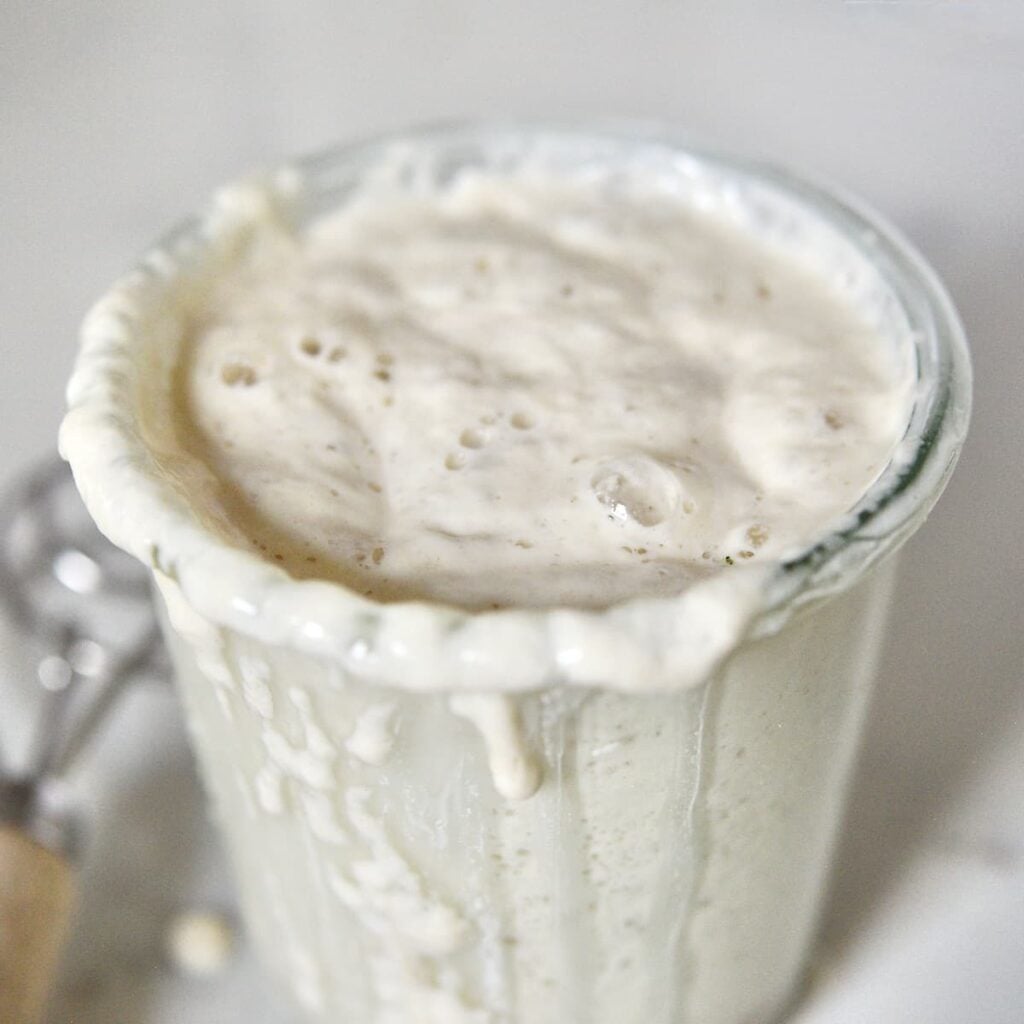
- very active sourdough starter: your main leavening
- flour: I prefer using a blend of 70% unbleached all-purpose flour and 30% whole wheat flour, but any ratio will work, even 100% whole grain flour
- sea salt: without salt the bread would taste very bland
Recipe video tutorial
To see me making the recipe, just watch this video tutorial. Otherwise, the section below this has a step-by-step summary of the instructions.
This recipe couldn’t be simpler to make!
How to make no knead sourdough bread
Because it’s an overnight sourdough bread recipe, I recommend starting just before you go to bed.
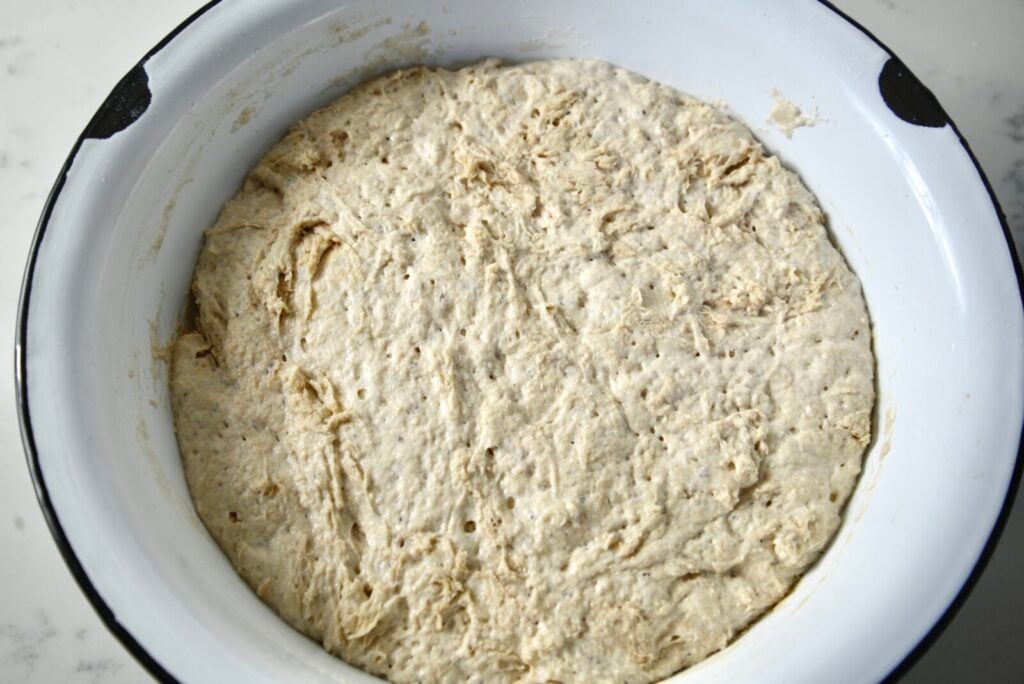
- Make and rise the dough overnight. First, combine the dry ingredients in a large mixing bowl, then stir in the water and sourdough starter.
Because there’s no kneading, the dough will be shaggy and sticky. Cover the bowl with plastic or a linen beeswax wrap and let it sit at room temperature overnight.
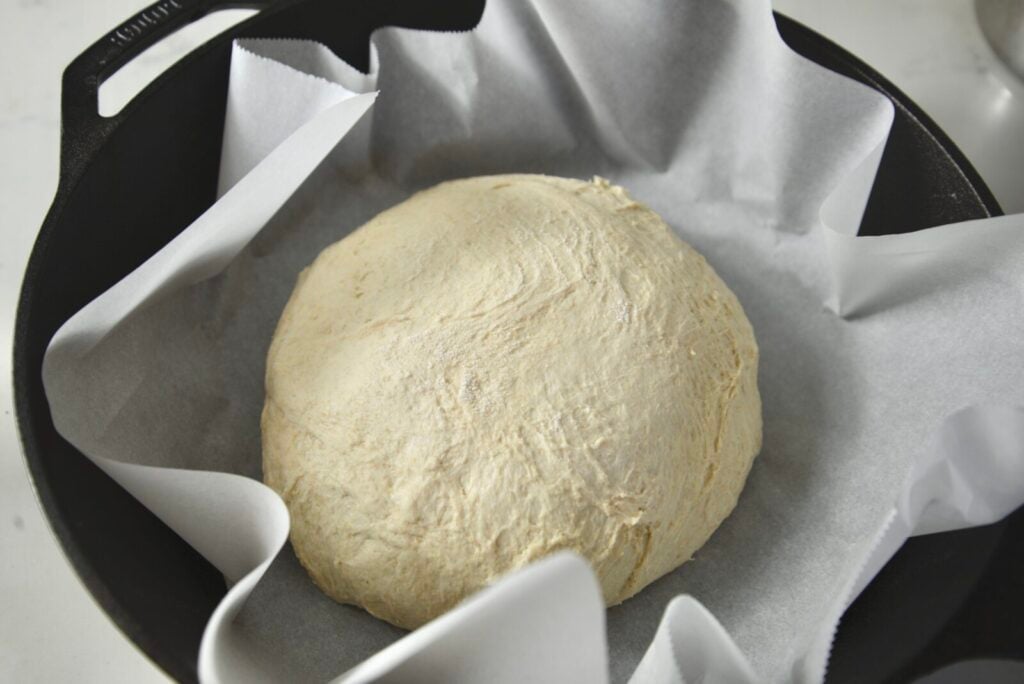
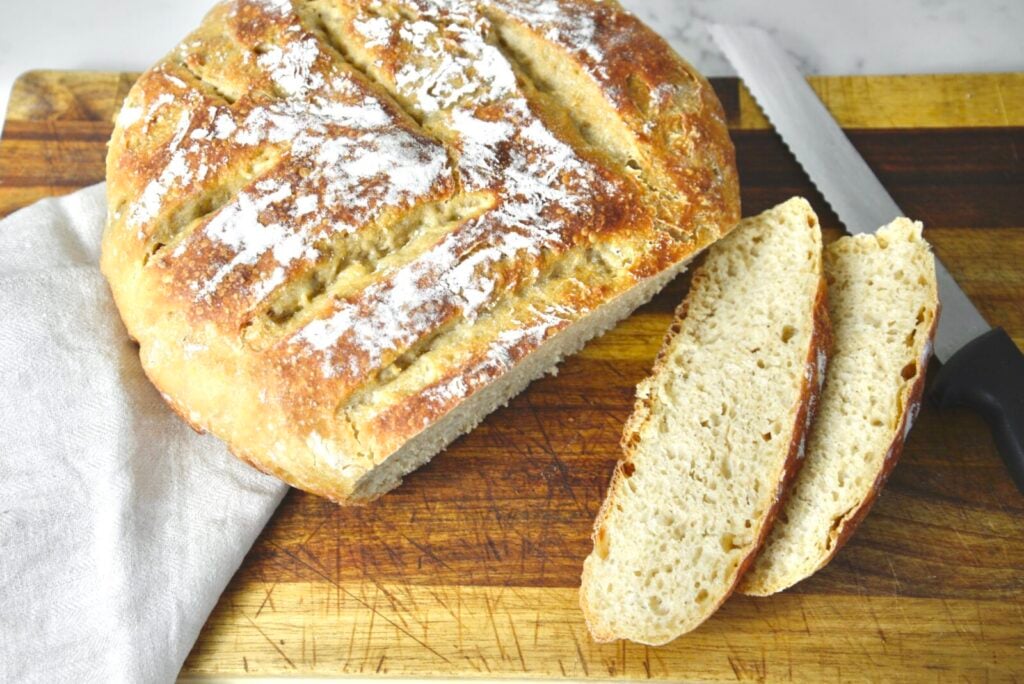
- Form the dough into a ball for the second rise. The dough is sticky and wet- flouring your hands will make it easier to manage. Let it rise in a parchment-lined Dutch oven.

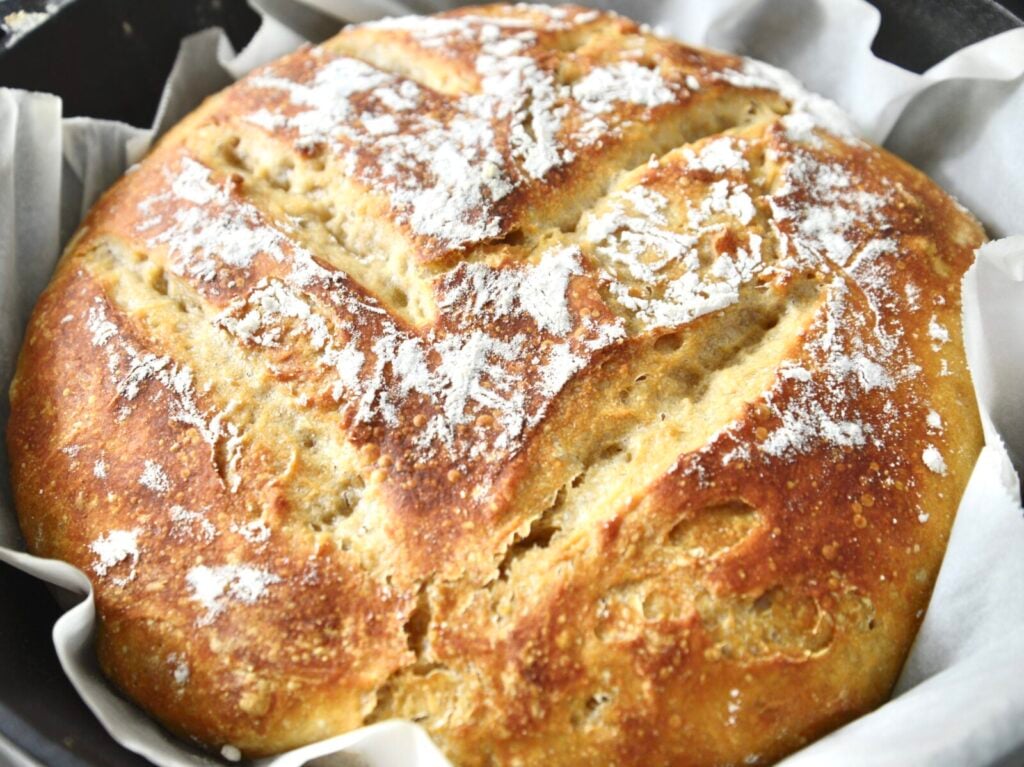
- Score the loaf, then bake covered for 40 minutes. Keep in mind that the dough is very fragile. To score the top of the loaf, use a very sharp knife, lame, or razor blade.
- Remove the lid and continue baking for another 20 minutes. The bread will be very hot, so use the edges of the parchment paper to help lift it out of the Dutch oven.
Do you see how there really is very minimal hands-on time? That is my kind of recipe and I have a feeling you might fall in love with it, too!
Most of the time, the bread smells so good that we can barely wait until it cools enough to cut a slice or two. It’s delicious with a bit of homemade butter and salt.
Storing leftovers
Honestly, this bread has the best flavor on the day it is baked. To keep it for a few days longer, wrap it in a linen bread bag, or place it in a paper bag.
Often, I place it inside of my stove where there is a lot of air circulation. Just remember to take it out before you use it! You can also store it with the cut side down in a big stoneware crock. I have actually written an entire post on how to keep your sourdough bread fresh.
Should you have any leftovers, I have several stale bread recipes you can make with your day old sourdough bread.
Overnight no knead sourdough bread FAQs
Not necessarily. Most of the time, I just let mine ferment at room temperature and it rises just fine.
I don’t recommend that. This particular dough is just too wet and shaggy. It would be very challenging to remove it from the proofing basket without “destroying” it.
Honestly, it depends. In the summer, your dough might rise faster than in the winter. A lot of people let the dough ferment overnight and just watch it for the second rise. When it gets as large as you want it, move on to scoring and baking it.
A little bit. After all, this is a sourdough bread. However, by adding a tad bit more salt and yeast and decreasing the rise time, your bread will taste less sour. Likewise, if you slightly decrease the amount of salt and yeast and increase the fermentation time, your loaf of bread will be a bit sourer.
Absolutely! Since it doesn’t require much work or baking skills, you will get a nice loaf of bread with your first attempt.
Since I am busy, I wanted a super-easy recipe with minimal hands-on time. Next to lactic acid, yeast cultures are part of the microorganisms that make up the sourdough. Adding a few more is not cheating in my book.
Technically, you can. I have not tried it myself and can’t promise that you will get the same fluffy, airy bread that you will get with this recipe.
In short, no, you do not. You can always leave it out completely. Or use about 1 tsp of sugar instead.
You can do a few things. During the second rise, you can keep the dough ball uncovered. This will dry out the bread a little bit. Also, you can place an oven-proof container on the bottom of your oven. This will create steam during baking and help make the crust more crackly after you take the lid off.
You can certainly preheat your Dutch oven before baking. However, because no knead sourdough is very sticky, it can be challenging NOT to burn yourself.

Easy No-Knead Sourdough Bread
Equipment
- bread lame or sharp knife
Ingredients
- 2 cups warm water (about 500 grams)
- 1 cup active sourdough starter (about 200 grams)
- 5 ½ cups flour (about 700 grams white, whole grain or any combination of flours)
- 1 tsp dry/instant yeast
- 1 tsp diastatic barley malt
- 1 TBSP salt (about 20 grams)
Instructions
- In a non-reactive bowl, mix all the ingredients into a uniform dough. It will be somewhat wet, sticky, and shaggy! Cover with plastic and let stand overnight.
- In the morning, scrape the dough off the sides of the bowl and with floured hands form into a dough by stretching the top side and roughly folding the dough underneath.
- Line a large cast iron dutch oven (or two smaller ones) with parchment paper. Set the dough ball inside the dutch oven. Put the lid on. Let it rise in a warm spot for a few hours or until is has about doubled in size.
- Gently flour the dough. Using a sharp knife or lame, score the top (optional).
- Set oven to 450˚ F. Put the lid back on the dutch oven and place it in the cold oven. Set a timer to 40 minutes.
- After 40 minutes of baking, remove the lid and bake for another 20 minutes or until the crust is nicely browned.
- Carefully lift the bread out of the dutch oven, remove the parchment paper, and let cool on a wire rack.
Notes
- you can use 1 tsp of sugar instead of the diastatic malt
- if you don’t have a Dutch oven with lid, you can put a heat-proof container on the bottom of your oven and fill it with some ice cubes as soon as you have put the bread in the oven to create steam
Nutrition
Other sourdough recipes you might enjoy:
Maintain Your Sourdough Starter without Discards or Feedings
Sourdough Bread with Olive Oil
European-style Whole Grain Sourdough Bread
Thanksgiving Stuffing with Sourdough Bread
Sourdough Pumpkin Bread Pudding
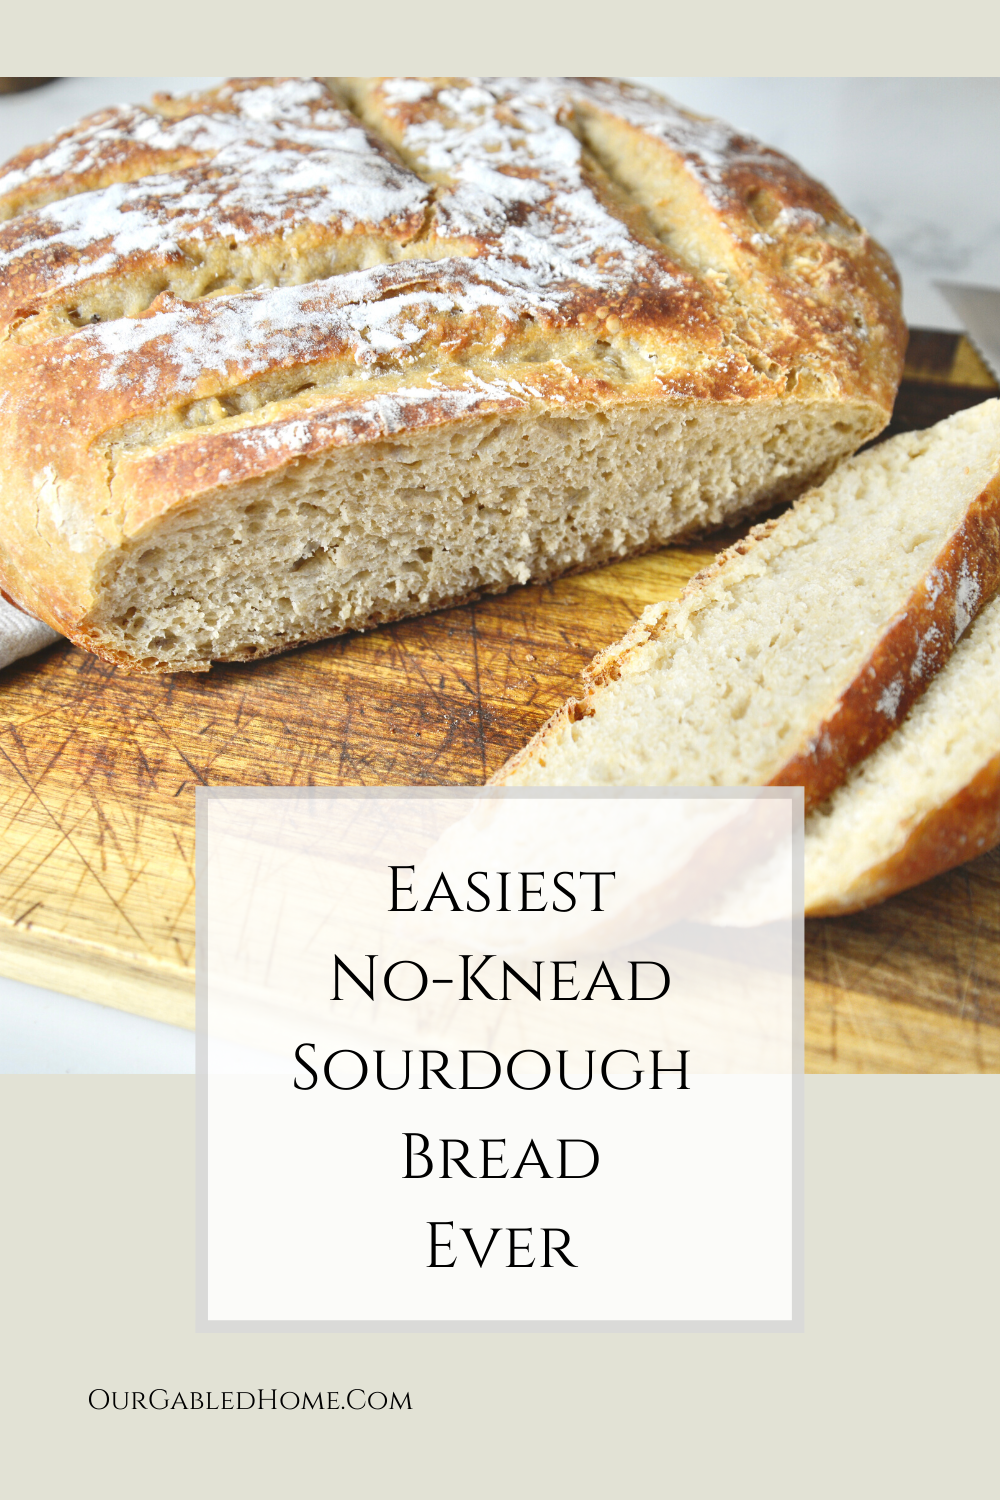
Pin It For Later
I am so so happy to have found your blog and youtube channel!!! My bread came out amazing!!! I was a little worried at first about the dutch oven. So many of my breads had a burnt bottom, but I tried the trick with the cookie sheet and it was perfect. It definitely takes time but hardly any hands on. Love it! Schmeckt wie vom deutschen Baecker. 🙂
That makes me so happy to hear! Es geht nichts über selbstgebackenes Brot ☺️
Do you have recipes that do not include yeast? Thanks I’m looking for something for a beginner that’s simple but no yeast
I have included the yeast to make it fool-proof and beginner-friendly but if you’d like to omit it, you absolutely can. Just make sure to have a very active sourdough starter and let your dough rise in a warm spot long enough so it looks like it has at least risen 50% ~ Anja
Hello! Thank you so much for sharing this recipe! If I put the dough in the fridge for the second rise, how many days May I leave it there before baking? Also, when I’m ready to bake it, should I let it come up to room temperature before baking?
It depends on how sour you like it but 48-72 hours should be ok ~ Anja
I watched your video and was going to make this Soudough recipe, however this is not just a sourdough starter recipe if you’re adding 1 teaspoon of instant yeast. This should not be promoted as a Sourdough Recipe. Anyone can make bread with “added” yeast
I know that this a popular debate. My goal was to make this bread accessible for beginning bakers so that they can feel successful. You can certainly omit the yeast but then you might have to do some stretch-and-folds ~ Anja
I use a Sourdough recipe often, like this one and add yeast if needed. It does not change the flavor of the bread. However it does enhance the Chrome. I agree it is a debate that is longstanding there are plenty of companies that make excellent yeast without preservatives. A great recipe thank you
Ultimately, it is a matter of preference. I am so glad you have a recipe you enjoy ~ Anja
Is there a reason why I couldn’t use KA unbleached bread flour?
No, their flour is great for baking ~ Anja
I don’t have 1 cup of starter. How would I feed it to increase the amount?
If you don’t care to have any leftovers, you can simply add 50g of flour and water each to your existing starter. Or add enough water and flour to give it that pancake-batter like consistency ~ Anja
Great recipe. I haven’t made sour dough bread in years. This came out great first time.
I am so glad to hear that ~ Anja
I have been making your sourdough starter. I use rye flour, diastatic malt and yeast. However, my starter doesn’t rise and doesn’t get bubbly. It smells and tastes somewhat sour. I have used it though to make the no-knead sourdough recipe. I use whole wheat and all-purpose flours. It comes out great. I live at a high altitude – 4500 ft. Does that make a difference? Maybe I’m not keeping the starter warm enough? Do you have any suggestions?
You might like to check out this resource: https://www.theperfectloaf.com/how-to-bake-sourdough-bread-at-high-altitude/ ~ Anja
Very happy with my second loaf, raised well and tastes wonderful, first loaf raised about 2″, I was so eager to try my starter wasn’t ripe enough, thank you for sharing your knowledge, I didn’t want to discard and feed all the time, so I’ll be making this again for sure.
Nice!! That is exactly when I recommend adding a bit of yeast ~ Anja
Hello,
I’ve made this recipe over 10 times and it’s been such a blessing. Thank you so much.
Do you have any tips for making it just a bit lighter or fluffier? I don’t know the proper terminology. My family loves it and are requesting that I make it just a touch lighter in consistency, if possible. Thank you, Matt
I am glad you enjoying this bread! You can make it lighter by adding a bit more liquid and yeast ~ Anja
Good morning, Anya! I love your channel and all your tips and recipes. Since I started my sourdough journey, your content is the best that I have found. I exclusively use your starter recipe with organic buttermilk, I use organic rye flour and a sprinkle of caraway seeds as you suggested and it does not affect the flavor of the bread. I have also used whey from raw milk but I like the results with buttermilk better. My question today is about the malted barley flour which I just ordered, would it be a benefit to add it to the starter? Thank you!
I am so glad to hear this! I have never added malted barley flour to my starter but I don’t see why you couldn’t. If you do, keep us posted on what you learned ~ Anja
Finished baking with an excellent tall loaf. Good flavor but has very little sourdough flavor. I will make this all the time.
Nice! I am so glad to hear you like this bread ~ Anja
My whole wheat starter would not rise until I added rye flower. That was 8 days in. Fed it last night and 9 hours later it was good and active. Mixed the dough and put it in a loaf pan. 3 hours later it is an inch over the rim. Baking now, so here goes. Can you wake up your starter with more buttermilk, or should it be water? I really enjoy your videos.
I am so glad you finally good an active starter. Once established, I only add water but if it looks sluggish, I guess you could add buttermilk ~ Anja
After the sourdough is prepped the night before baking, should I cover with plastic wrap and leave on the counter all night or should the dough go into the refrigerator overnight?
Love, love your simple sourdough techniques & recipe!
Thanks so much!
I am so glad you’re enjoying my sourdough methods and recipes! Over night, keep the SD starter loosely covered on the counter ~ Anja
I made the dough last night but I want to bake it for dinner tonight. Should I punch it down now (11:15am) put in the cast iron pan and is it ok to wait till 5pm to bake? Thank you for your wonderful posts.
I would keep it in the fridge in a proofing vessel until you are ready to bake ~ Anja
Good morning Anna, I love your easy but effective recipes. Ich bin in Westfalen geboren. und lebe seit 30 Jahren in Canada. I find the Easy Sourdough too wet when I want to form it into a ball before the second rise. I followed the measurements to a T. Any idea what I could do different to make it a little less sticky? Thank you kindly Anna! I am so grateful I found you here. Greetings, Margarete.
Ach, wie schön! I like to wet my hands when handling the sticky dough until it comes together. Hope that helps ~ Anja
Made my very first sourdough bread with this recipe and it looks like a WINNER!!! Thanks Anya for your generosity in sharing so much with us.
Of course! Glad to hear you love your bread ~ Anja
I am a newbie at sourdough & finding it all so tricky. I have an almost ready rye starter and am terrified to actually make the bread! Do you recommend doing 100% rye flour for the loaf Anja? Also, I have a cold house (Ireland) and my starter shrinks overnight. Can I still use it without feeding it?
Sometimes you just have to get started! I actually recommend wheat flour or bread with mostly wheat flour. Once you master that, you can start substituting some of the wheat flour with rye until you get the ratio you like. You got this!
Hi Anja, I am still enjoy making your easy no knead sourdough bread. Just wondering if I could make a cheese bread with this same recipe. How much cheese and at what point of your recipe do I add it?
Thank you. Lorraine
Yes, that would absolutely work! I recommend adding the cheese before the last rise and you can use about 200 g for this recipe ~ Anja
Hi Anja,
I am fairly new to sourdough baking. Love your videos and tips. I will be driving to my daughters, a day’s drive and want to take her some sourdough starter. Last year I fed it the day we left and placed in the cooler, however acouple weeks later she found it to be moldy. What can I do different so this does not happen again as she wanted to start using. Any help is greatly appreciated.
Thank you
You can put it in a cooler and/or add a LOT of flour to it. If you think you can’t keep it consistently cool, you could also dehydrate and rehydrate it upon arrival. You might like to read this: https://ourgabledhome.com/how-to-dehydrate-your-sourdough-starter/ ~ Anja
just baked it for the first time and it looks great. However, eventhough I dusted the parchment paper with rice flour, it stuck to the paper. I realize that this is a very wet dough and was wondering how to avoid this. Would using more flour initially help? the first rise only took about 4 hours and the second only 2 hours.
thanks for your help
It seems like some parchment paper brands are sticker than others. You might have to try another brand. Or add more flour to it ~ Anja
While it is true that the quality of parchment varies, if you dust your parchment paper with a bit of cornmeal before you place your dough on it, the paper will release easily.
I have been using the video “Bake A Delicious Sourdough Bread with Me – Even Beginners Can Do It!” with great success! I am wondering if the recipe can be cut in half to make a smaller loaf. If so, how would you adjust the baking times?
BTW, I love your starter method with no feedings and discards. It is so much easier and does not waste anything!
Thank you.
Nancy
I am so glad you enjoy my SD method. You can absolutely cut the recipe in half. Then bake for 20-25 mins with lid and an additional 20 mins without. But definitely check your bread during baking ~ Anja
Hi Anja,
Love your videos and just made the sour dough starter and is ready to make bread. Can I use barley malt syrup which I already have in this recipe instead of the barley malt flour?
Yes, that should work just fine ~ Anja
Hi Anya,
Love your videos and Just started watching you recently and made the sour dough starter recipe which was so easy to follow, and looks alive and ready to use. I was wondering if I could use barley malt syrup which I already have instead of the flour and if so how much? Thanks!
Karen
That’s great to hear! And yes, you can use barley malt syrup. It’s not exactly the same but will work ~ Anja
I finally baked my bread. It is amazing. I went exactly by the recipe. I love the fact that this is so easy. When I first watched the videos and read it took me several times to understand. It is certainly the easiest bread I have ever made. No kneading and discards make that true. My only trouble was my timing. When do I need the bread so when should I take it out for the first rise and so on. I finally figured that out. Lol. Thankyou for all you effort and testing I don’t think I will even try another recipe. I used unbleqched all purpose. I ordered the malt and caraway seeds from amazon.
Nice! I am so glad to hear this! The timing can depend a lot on the temperature in your home and your SD starter but over time, this will be so much more intuitive ~ Anja
How much starter (approximately) do you use for this bread?
It says in the recipe, about 1 cup ~ Anja
Hello,
This recipe is amazing! I had shied away from attempting sourdough after watching all the waste and complications in other recipes 🙈🙉 my second one turned out even better (I think the first one could feel my nervousness 😆) So thank you Anya. My only question is: how do I keep the parchment paper from sticking to the bread? I watched the video and read the recipe and didn’t see anything on this. Thanks again!
Jen
Nice! I am so glad to hear you like this recipe. Sometimes, switching brands can be the trick. Or wait for another 10 mins to peel it off. Hope this helps ~ Anja
I don’t have a cast iron Dutch oven, but do have a 10″ cast iron skillet, no lid. What would be the effects of using no lid on the bread?
I baked my whole grain white wheat bread uncovered in a cast iron skillet. After the first 40 minutes it had already reached 191 F, so I let it go for another 10 minutes and it was good to go. Man, this stuff is so good! I’d send a pic but don’t know how. I’m happy happy happy to have found this website and recipe, as my gut issues don’t allow me much bread and I’m hoping this will be the ticket for me. Thank you so much for your time and effort in sharing so much information with us! I notice how you reply to most of your commenters’ remarks, and that takes a lot of time.
Without a lid, you won’t be creating steam and that can stop the bread from expanding. But you might try to put aluminum foil over it to trap the steam. Hope this helps ~ Anja
Thank you so much for your recipes Anja. I really like your no discard no maintenance sourdough starter. Just made your easy no knead recipe. It rose so much overnight that I had trouble manipulating it. So I decided to cut the dough in half and shaped each to fit in a loaf pan. I will bake one loaf at a time, putting each in my covered Dutch oven. Just wondering how to adjust the baking time?
I am so glad to hear that! You can cut the baking time by 15 mins. Or measure the internal temperature, somewhere around 200˚F indicates that the loaves are done ~ Anja
I make my own diastatic malt. It’s simply barley or wheat berries, sprouted, dehydrated and ground into flour. It makes a HUGE difference in my whole grain breads!
That sounds really easy! Thank you so much for sharing ~ Anja
Good day Anya. When I get ready to make the bread, and take the starter out of the fridge, which is well floured, what step would I take to get it activated for the recipe?
Have you seen this post: https://ourgabledhome.com/easy-sourdough-starter-no-feedings-no-discards/ That will explain the process. Happy baking ~ Anja
Hi Anja! I am planning to try making this bread soon. My question is; when you leave the dough to stand overnight, is that on the counter? The refrigerator? Is refrigerator an option..because I live in a very warm and humid environment..? (Ok..3 questions😬) I am super excited to try this!
Yes, I leave the dough out on the counter but you can let it rise in the refrigerator if your kitchen is too warm. I have actually done that in this recipe: https://ourgabledhome.com/how-to-make-crusty-german-bread-rolls-brotchen/ Hope this helps ~ Anja
What can you use as a substitute for the Barley Malt? I don’t have any on hand, but would love to make this bread. I’ve already made the starter, and ready to get the bread going.
Thanks in advance.
You can always use ½ to 1 tsp of sugar to help the yeast along ~ Anja
What is the diameter of your cast iron for this recipe? Thanks in advance for your reply.
I either you ONE 12″ cast iron or TWO smaller ones. Hope this helps ~ Anja
I’m midway through making a starter. I just purchased a Cuisinart Chef’s Classic enameled cast iron Dutch oven. On their tag it says not to use it dry. I’m thinking that I should be safe using parchment paper without greasing the inside of the pan. Have you experimented with enameled cast iron for bread?
That sounds great, Cathy! I have used an enameled cast iron before but no prefer my regular cast iron since I am baking the bread at 450˚F and have heard that it can hurt the glaze. That’s just my little opinion ~ Anja
Gruestig Anja,
I would like to keep the remaining sourdough starter to use again but there is only a little bit left in the jar after taking out 1 cup of it for the bread recipe. Should I just add flour to it and stir it up for a few days on the windowsill before I pour more flour on it to deactivate it?
Hi Sandee, yes, you can do that! Just add a bit of flour and water, let it ferment, and then add a whole lot more flour before you put it in the fridge. Hope this helps ~ Anja
I started this last night and we had it for lunch. The crust was the absolute best! Many thanks, Anja.
Hi Nana, your comment really makes my day! Good for you! Happy baking ~ Anja
Anja, thank you very much for the simplicity of your sourdough starter and the easy sourdough bread recipe.
I have not bake it yet but I will this weekend.
I have looked at tens of recipes and they were so ridiculously elaborate that I did not think I could find anything I would try, I almost gave up, then I found you. Really, are there many people out there taking the dough temperature. I was thinking, a hundred years ago, where women had so much work, did they have the time to be taking the temperature of the dough? Thank you, thank you again for your encouraging posts.
Ana
Yay! I am so, so glad you like my sourdough bread recipe! I don’t like complicated, either. Let me know how it turns out and happy baking ~ Anja
I’m looking forward to making this bread but I have one question. When you say to use 1Tbs of salt is that regular table salt or kosher salt?
I always like to use sea salt. If you have a scale you can weigh out 20gr which will be more accurate. Hope this helps and happy baking ~ Anja
I want to thank you for sharing your wonderful recipe. I used it and my first loaf of sourdough came out beautifully.
Hi Wendy! I love hearing that you baked a beautiful loaf of bread!!! Thank you so much for sharing ~ Anja
Thank you so very much for the starter recipe and this sourdough bread recipe. This has been my first try with both and I could not be more satisfied with the results. Starter and bread results were just as your YouTube depicted. Kudos, Anja.
Yay, that makes me so happy to hear!! Thank you so much for sharing, Jo!!
My question is, if I need 2 cups of starter how do I go about enlarging the starter when I take it out of the refrigerator the night before I want to use it? I am really anxious to try your starter, it
sounds so nice and simple which is exactly what I’m looking for, thank you so much.
Good question! If you need more starter than what you have, I would take it out 2 nights before and add about ½ cup extra flour and enough water to make it thick runny. Then let it sit for a day. The next day you should have at least 2 cups of starter. Hope this helps – let me know if you have more questions ~ Anja
This looks really interesting! What do you think would happen if you baked it in a preheated dutch oven and oven, instead of cold? Love the idea of no stretching and folding.. lol.
Oh, I think it would work really well! However, I like the cold oven method since that way I don’t have to deal with dropping the dough into a piping hot dutch oven. So glad you like this recipe!
Dear Anja,
I made the bread today and WOW it turned out great! It was so easy to make and it is delicious!!! You have been so helpful to me. My husband and I are so excited that we have this now and plan to make bread all the time going forward. Thank you so much for sharing with us!
Great post! I love no-knead bread recipes!
Yes, me too, so easy!
No kneading!!! Now that sounds like the bread recipe for me! Thanks so much for the info!
Yep, very simple, so glad you like it!!
do yo think this could also work if you wanted to make mini sandwich loaves for Italian subs? does the pan have to be covered? Thanks in advance for any ideas you would have for this.
I would think that could work. You’ll want to watch them closely as they’ll be done sooner than a big bread. If you do, let me know how they turn out ~ Anja
That bread looks amazing and I can’t wait to try the barley malt!
Yes, I am sure you’ll love it! Happy baking, Emily!
Love a good no knead recipe! I’ll try this one. Also love and use your tips for keeping a dryer no fuss starter…in the fridge!
Thank you! I am so glad you like both my bread recipe and my sourdough method ~ Anja
That looks so good, Anna! I’ve never heard of this barley malt before. Thank you for teaching me something new!
Yeah, so happy I can share things! Happy baking, Sylvia!
can this be baked on anything other than a cast iron pan?
I haven’t tried it but a glass or metal loaf pan should work 👍
I often add dry yeast too! Love your post, really great read!
Thank you – your comment means so much to me!!