How to Render Beef Tallow – No Special Equipment Needed
If you have a stove and a pot, you can easily render beef tallow. I’ll show you this simple method to make it white and odorless.
Learning how to render tallow is such a quintessential skill in any homemaking and homesteading kitchen.
It goes back to those days when most people had – or bought – whole cows. Then you couldn’t afford to waste anything, not even all the fat. Once you render the beef fat you end up with beautifully white tallow.
You will love it not only for cooking but for so many other uses!
This post contains affiliate links, which means I make a small commission at no extra cost to you. You can read my full disclosure here.
Why you’ll love my simple method to render tallow
If you have been following me for a while, you might have noticed that I don’t do complicated. For me, things have to be simple.
I love when I can just use very basic equipment and processes.
This tallow-making method could not be simpler! All you need is a stove, a pot, and some patience.
Well, in the end, you will need a few more items but we’ll talk about that in a bit.
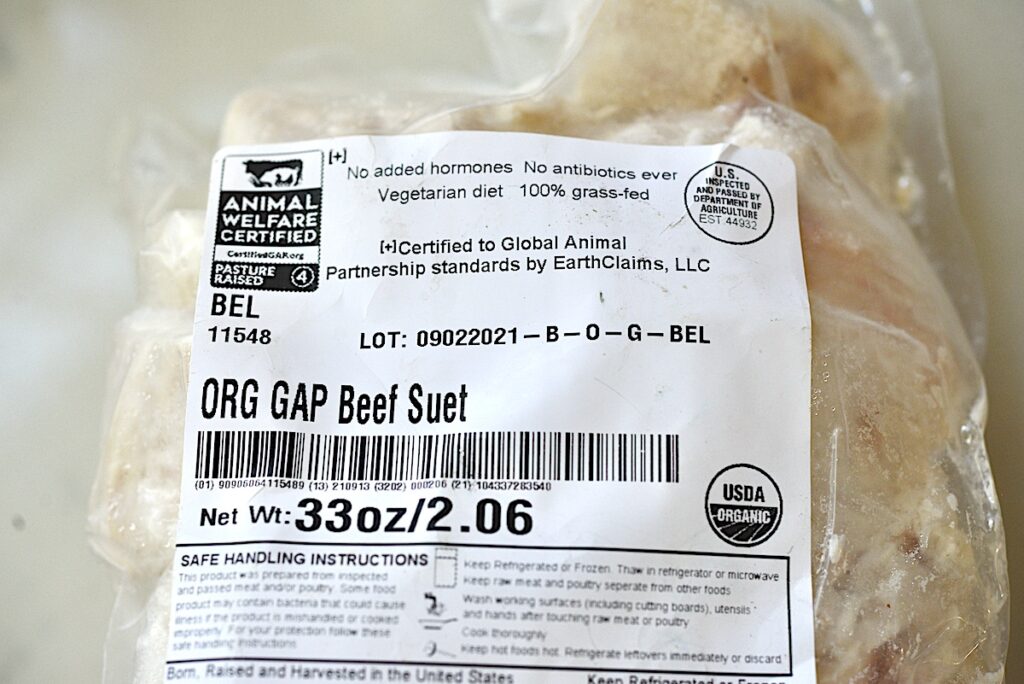
Where to source beef tallow?
I always recommend that you get the best ingredients you can afford.
As for meat products, obviously, the gold standard is to get them from grass-fed and grass-finished animals.
You might be able to join a CSA in your area that will send you meat from pasture-raised cows.
Or you might be able to find a farm in your area that will sell you good meat.
There are some subscription boxes where you might be able to source quality tallow, too. Think Butcher Box but you can also google some other delivery services.
You can also talk to your local butcher and see if they can source it for you.
I often buy meat with a lot of fat on it on purpose. Then I simply cut off all the fat and keep it in the freezer until I have enough to render it for tallow.
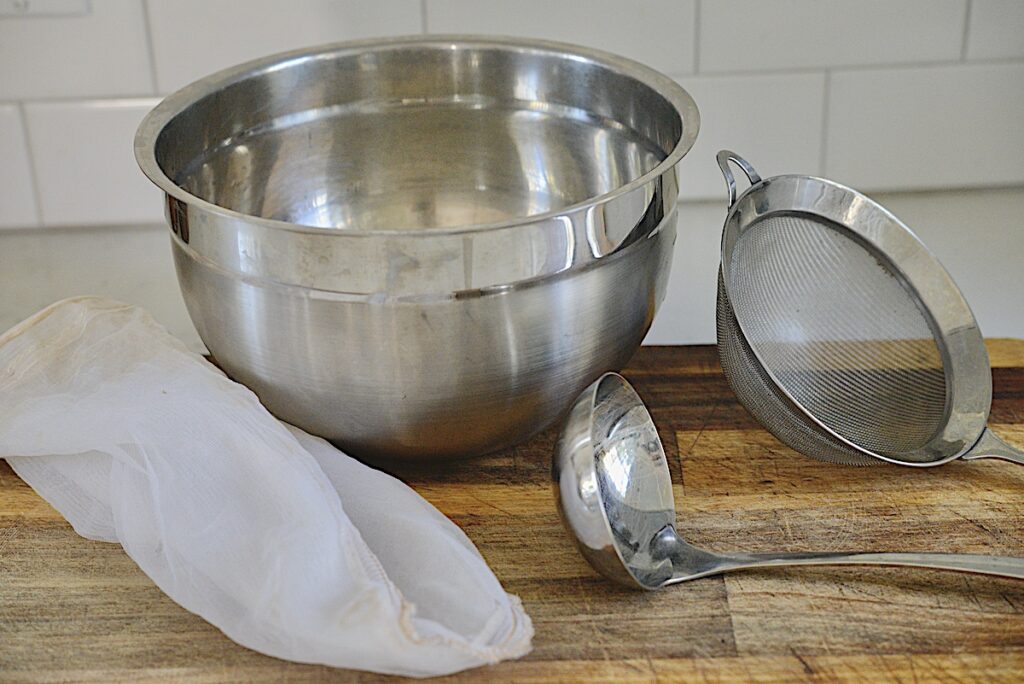
Useful tools and equipment
Here’s the equipment I recommend:
- Pot: Depending on the quantity of beef suet, a medium-sized stainless-steel pot is perfect. I often render about 2 pounds at a time which is a good amount. You can do this right on your gas or electric stove.
- Stove: I love using my gas stove for this process but you can do this on an electric stove just as well!
- Simmer plate: Even though, we technically have a simmer burner I find that I get more heat than is optimal for tallow making. Therefore, I love using a simmer plate. You can also use anything heat-proof that moves the pot further from the heat source.
- Stainless steel bowl: These bowls often have such a design that you can easily slide out your solidified tallow (more about that below)
- Sieve: Any sieve will work that is longer than the diameter of your bowl
- Cheesecloth: This is crucial when it comes to purifying your tallow. Since I have a dedicated cheesecloth for dairy products, I often use just 2 paint strainers doubled up.
- Mason jars: widemouth mason jars are perfect if you mainly want to use your tallow for cooking
- Glass baking dish: I like a rectangular or square baking dish so that I can cut up the tallow into flat pieces.
- Parchment paper or wax paper: Lining your baking dish with either parchment paper or wax paper makes removing the solid tallow a breeze.
How to render tallow
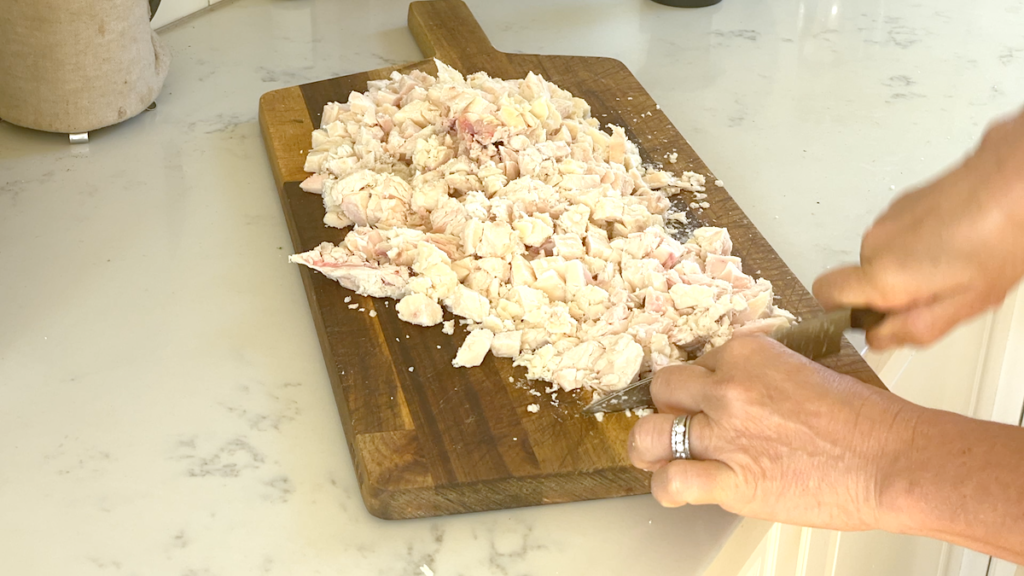
Chopping the beef fat
It really helps and speeds up the process to cut the bigger chunks of beef fat into very small pieces. With a very sharp knife, this won’t take long. If you own a food processor, you can also use that. However, I find by the time I have cleaned that all up, I can also chop the suet by hand.

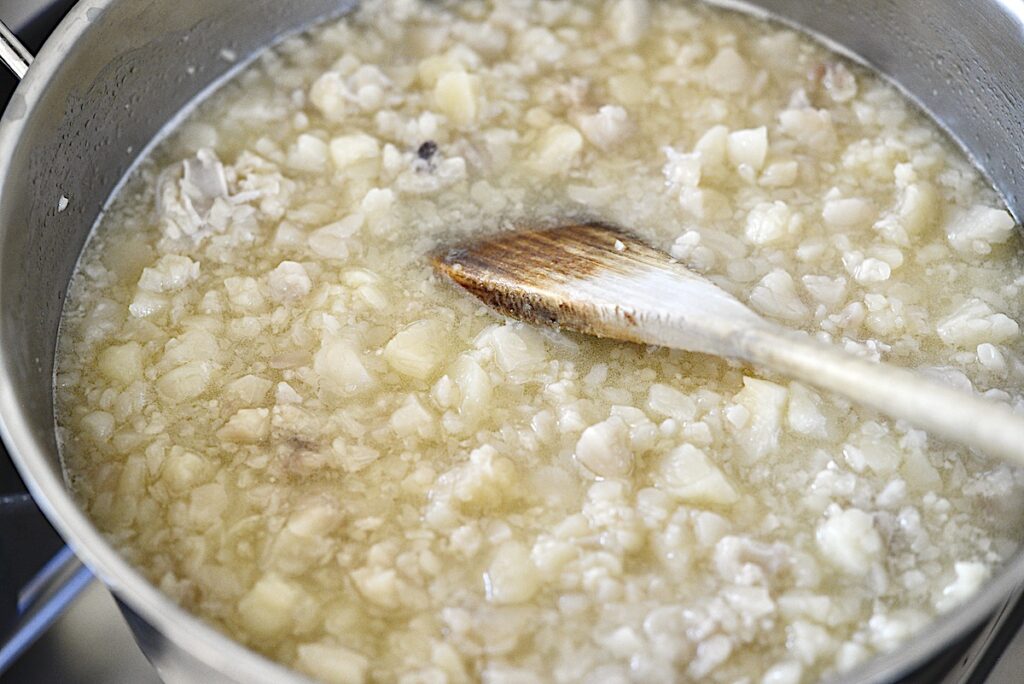
Melting the beef suet
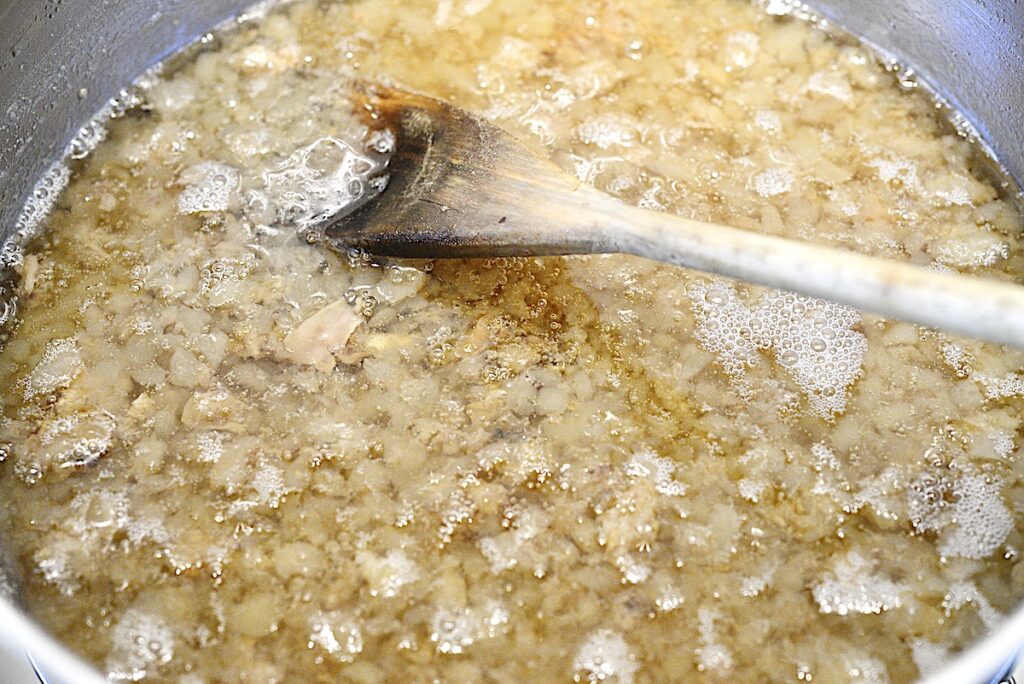
This is the most time-consuming part. Place your chopped beef fat in a pot big enough to hold it all.
Now, pour filtered water over it so that it is barely covered. Then I add about 1-2 tablespoons of salt. This will really help draw out all the impurities.
Over low heat, bring this water-fat mixture to a very gentle simmer. This is important because you don’t want to scorch anything or brown it. I recommend keeping a close eye on your pot and stirring it every so often. The whole process might take about 5-6 hours, depending on how finely you chopped the fat and how much you are rendering.
If you run out of time in your day, you can always turn off the heat, and resume the process at a later time!
Straining and purifying the tallow
Once all the fat has melted into a golden liquid, you will see all the bits and pieces of meat and other stuff floating around in there.
Line your colander or sieve with cheesecloth or paint strainers and place it over your stainless steel bowl. Very carefully pour or ladle the liquid tallow into the cheesecloth or strainer. If the bits and pieces are clogging it up, you can remove them halfway through.
You can also use a spoon the gently squeeze out more tallow.
Let the tallow solidify in the bowl.
What to do with the bits and pieces in the tallow?
You can place these bits and pieces on some paper towels. While they are good for eating, I don’t find them quite as palatable as lard cracklings. With some salt and pepper, they are not bad.
If you have a dog, they will love to eat those! I serve them in small quantities as a treat to our dog.
Or you simply toss them out.
Are there more impurities in the tallow?
Once the tallow has solidified in the bowl, it’s time to check for impurities or any brown residue. That will make your tallow go bad quicker.
If the tallow doesn’t just slide out of the bowl, you can gently move the bowl over a low-heat burner to just melt the bottom. Then it will easily slide out. Turn it upside down. If there is any brown stuff, just take a knife a scrape it off.
If there are more impurities in it, you can repeat this process and strain it a second time.
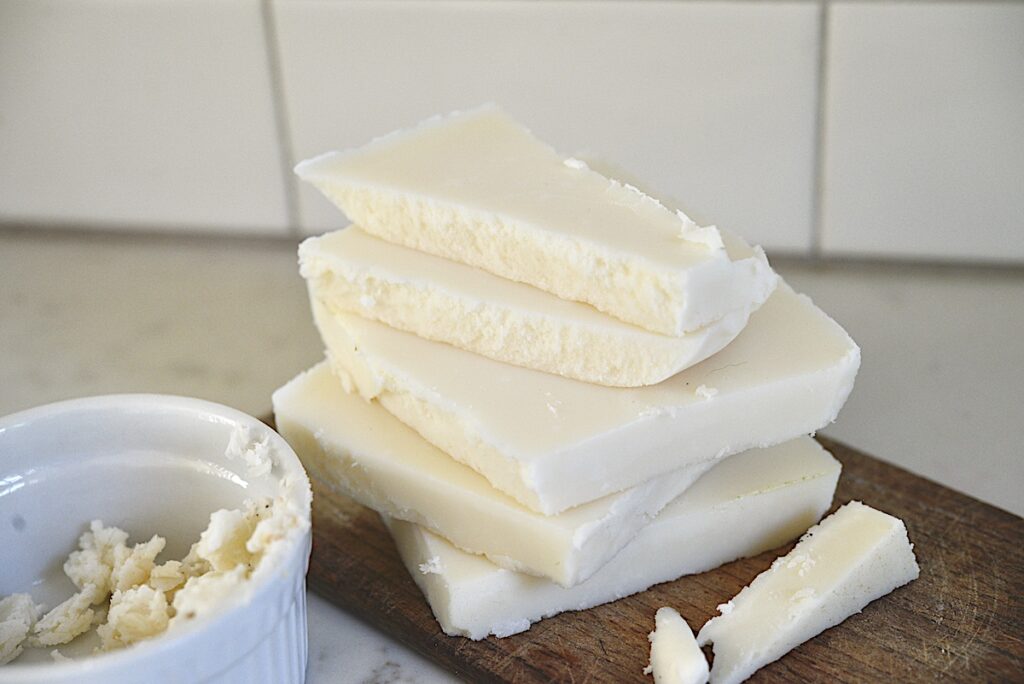
If done right, your tallow should be almost white and practically odorless.
How to store beef tallow?
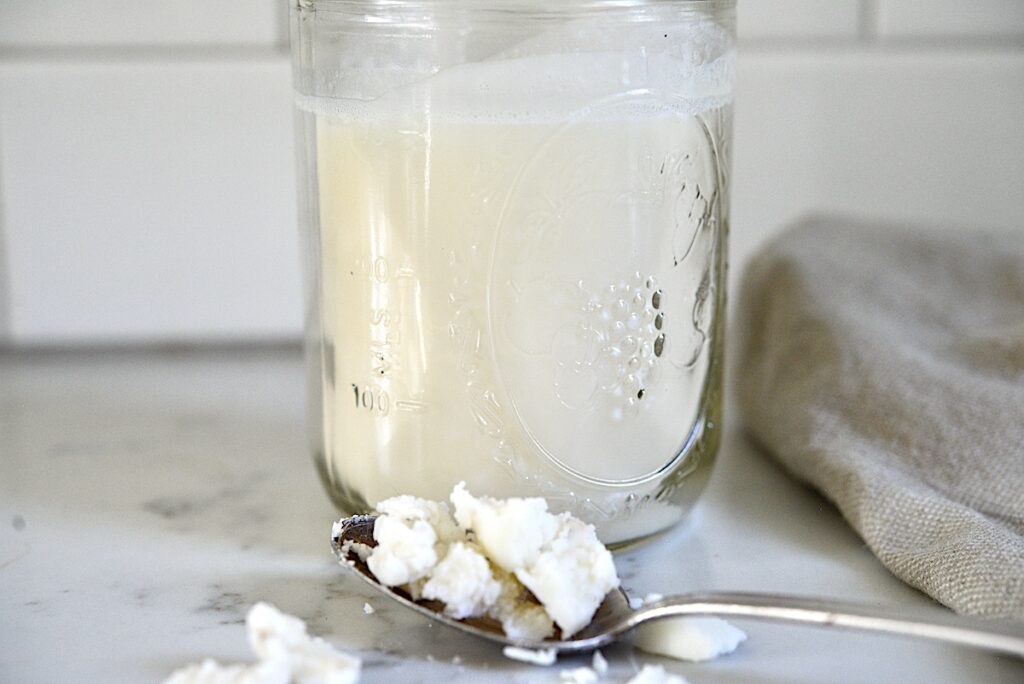
How you store it largely depends on how you intend your use it. If you want to mostly use it for cooking, you might like to gently remelt it and pour it into wide-mouth mason jars. I recommend wide mouth so that you can get your hand in there to scoop it out. Even at room temperature, beef tallow is pretty hard.
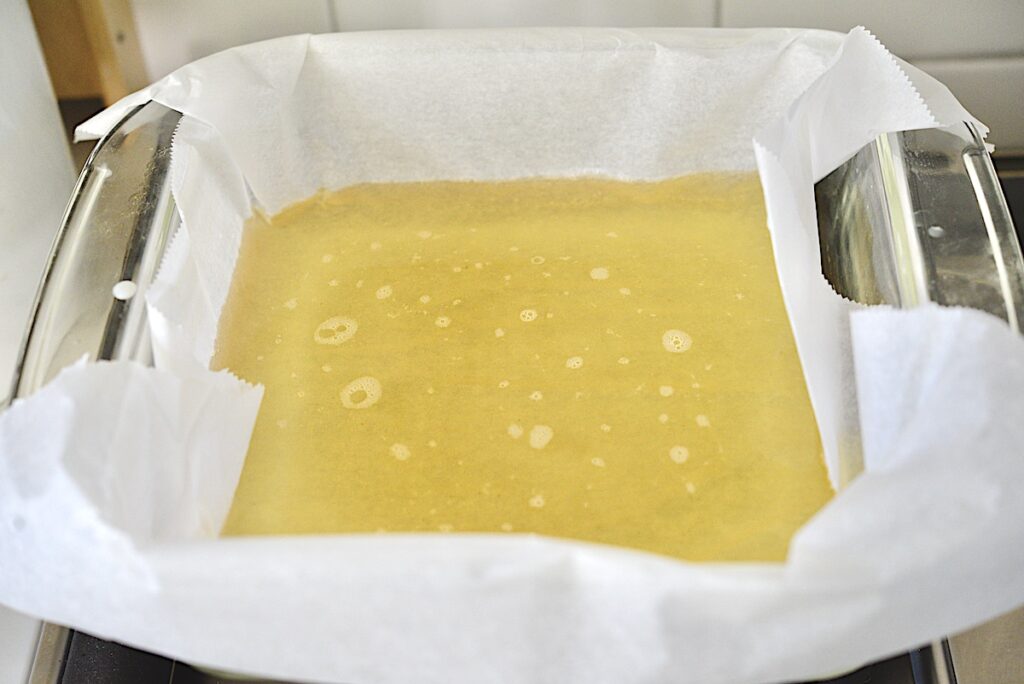
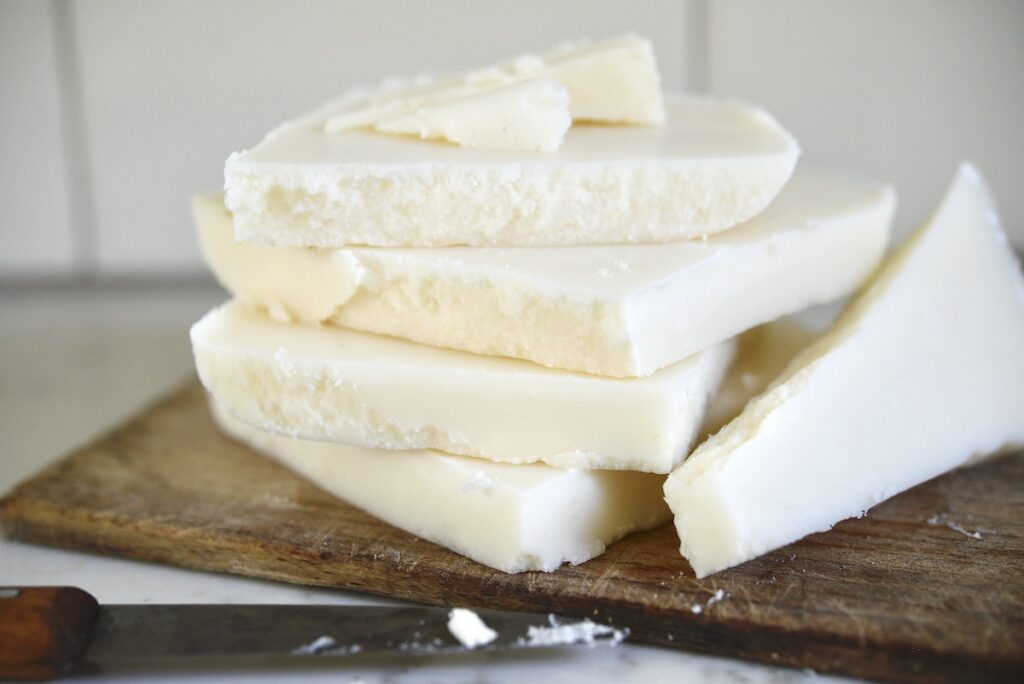
If you’d like to use it more for skincare or soapmaking, I recommend remelting the tallow and pouring it into a square or rectangular baking dish that you like with parchment or wax paper. Once it has become solid, you can then cut it into smaller blocks that are easy to handle.
Can you render tallow in a crockpot?
In short, yes! If you already own a crockpot you can very easily use it to render your tallow. You want to chop the beef fat into very small pieces, too. And I still recommend keeping an eye on it and stirring it every so often until all the fat has melted.
Can you render tallow in the oven?
This is another yes! Simply take the same steps as above but place the finely chopped beef suet into a stainless steel or enamel pot and place it in your oven at 250˚F. As with the other methods, I recommend stirring it every so often until it is completely melted.
How long does beef tallow last?
- in the pantry: if stored at room temperature, tallow will keep for up to six months. For that, make sure you have purified the tallow really well!
- in the refrigerator: tallow will get a lot harder in the refrigerator but will easily last about one year.
- in the freezer: if you store tallow in the freezer it will keep for years!
If beef tallow healthy?
Yes!
I think that the fear of fat is so last century. We now know that healthy fats are part of any good diet.
If you source the suet from healthy, grass-fed animals, it is full of cancer-fighting CLA, Vitamin K2, and heart-healthy omega 3’s. It also contains Vitamins A, D, K, E, and B12.
How can you use beef tallow?
These are some ways you can use tallow:
- cooking: any time you’re looking for a very heat-stable fat, you can use tallow
- frying: since tallow has such a high smoke point, it is an excellent fat for frying. At the same time, it gives your foods a deeper, more complex flavor that you will love! Definitely try frying potatoes and you’ll never go back!
- skincare: tallow is very moisturizing. You can use it in creams and whipped body butters.
- soap-making: since tallow is so moisturizing, it also makes an excellent ingredient for your homemade soaps.
- candles: our ancestors already knew that you can use tallow to make your own candles.
- bird-food: especially in the winter when snow covers the earth, the birds in your backyard will love it. You can warm up the tallow, add a bunch of the appropriate seeds to it, and roll it into a ball that you can hand from tree branches.
- more uses for tallow: you can click on this article to learn about even more ways how to use tallow
Other homesteading recipes you might like
How to make a sourdough starter
Shop this post:
Let me know if you have any questions or comments!
Pin For Later:

I used a crock pot without water to render grass fed tallow. It looks clean, but still smells like beef. Should I repeat the process and would that help remove the smell ? How about straining through cheesecloth using charcoal flakes ?
Sometimes, using water helps get rid of the smell. Otherwise, it might be your particular tallow that might have a beefy smell ~ Anja
Repeating the process, do I add water barely covering the fat then cook, if so how long? Or just melt it down and strain?
That depends on your beef fat. If it’s pretty clean and white you might just melt and strain it otherwise, cook it longer in water ~ Anja
Does the water that you add always completely evaporate? I’m always concerned about there being moisture left over and making it not last as long. Is this something you skip if you are using it for skincare?
Ideally, you want all the water to evaporate but not strictly necessary ~ Anja
I am thrilled to read this! I’ve been putting off trying to do tallow for so long but wow…I never thought about saving those pieces I cut off of meats to save it. We had a farmer once who gave us the tallow from our grassfed beef we bought (we buy a half cow at a time) but it was a convenience then because he was making it himself anyway… it has’n’t worked out to do that since… but I’m going to print this out and I think we just may give it a shot. I hear it smells terrible while you are making it…but maybe it’s less with a smaller batch?
I didn’t find the smell of rendering tallow too bad but then it also depends on the quality of the tallow you use. You can always start with a smaller batch and see how you like it ~ Anja
I am of the generation of fearing fat! Started using lard this year slowly…. Good info thank you.
I get, sometimes it needs a bit to shift your thinking. Tallow is definitely worth it ~ Anja
I have always been fascinated by this process and I hope to do it someday. Thanks for such detailed instructions!
Do it! It’s so worth is and so versatile and healthy ~ Anja
I loved the line.. “the fear of fat is so last century”! YES! Could not agree more! This is a great tutorial and I can’t wait to try it. Thank you for sharing, Anja!
Ha, thank you so much, Hollyn!